
Model #SFP-100 – Self-Priming Floating Pump

RUGGED, RELIABLE AND READY
ATTENTION
Your WARTHOG PUMP must be shipped dry WITHOUT engine or gear case oil.
Do not start engine until oil is added to the engine AND gear case.
Read this manual and the engine owner’s manual carefully before operating your WARTHOG PUMP.
Before Starting the Warthog Pump – Important
Engine – WARTHOG PRODUCTS INTERNATIONAL INC. recommends the use of full synthetic oil in the engine. Refer to the engine owner’s manual for minimum engine oil requirements and fuel requirements.
Also refer to engine owner’s manual for oil change requirements, engine service requirements, engine starting instructions and use of the manual choke.
Gear Case – The gear case in your WARTHOG PUMP requires 1 litre ( 35 ounces ) of full synthetic 30 weight oil ( recommended ) or 30 weight mineral oil.
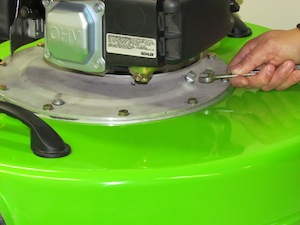
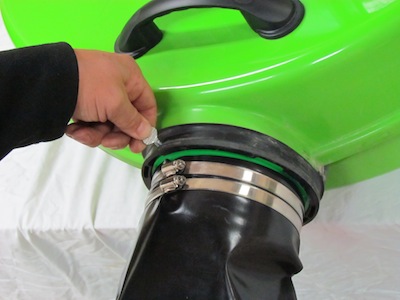
- Remove the pump gear case oil plug, see picture. Then fill the gear case with the recommended amount of oil and grade as listed above and replace and tighten the oil plug.
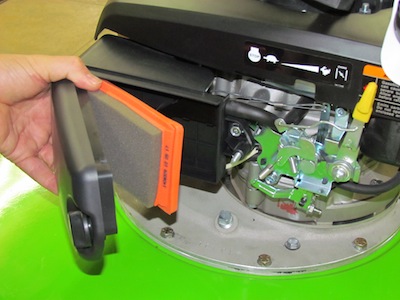
Note: Removal of the engine air filter may be required to make it easier to fill the pump gear case, see picture.
Engine/Pump Start-up Recommendations:
- Prior to pumping start the engine on dry land and run for two minutes to ensure easier starting once it is placed on the water.
- Ensure the hose does not have a twist in it before starting the engine to begin pumping.
- Run the pump at full throttle as your WARTHOG PUMP is engineered to run at full throttle.
Fluid Level Checks:
- Check the gear case oil level every 24 hours and/or before every use and add if required.
- Check the engine oil level before every use and add if required.
- Fill the engine with gasoline prior to every use.
Initial Hose Connection to the Warthog Pump:
Note -It is very important that the hose/coupling assembly is installed properly as a twist in the hose will cause the pump to tilt sideways in the water.
- Set the pump and hose on a flat surface, ensure the hose is not twisted and lays flat.
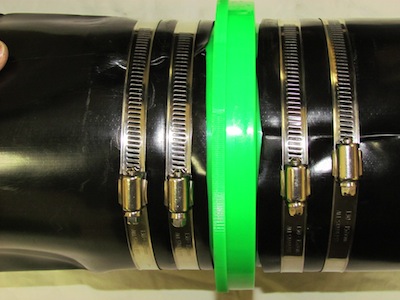
- Slide two stainless steel hose clamps over approximately 1-2 feet ( half a meter ) of the hose, see picture
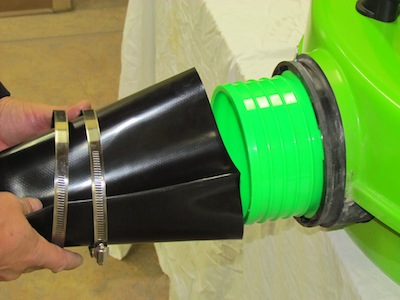
- Slide the hose end over the male coupler attached to the pump, pump is shipped with 1 Male quick-coupler already attached to the pump, see picture
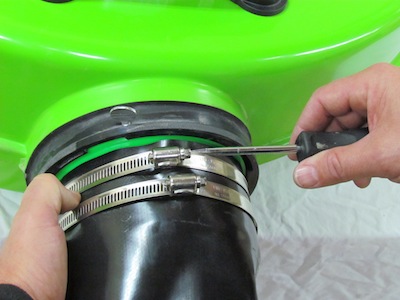
- Position the stainless steel hose clamps over the coupler and hose assembly (ensure first hose clamp is securely fastened over the first rib of the coupler closest to the pump, and the second is fastened closer to the last rib of the coupler), then tighten the clamps and ensure the locking thumb screw is turned until you feel it seat on the coupler. See picture.

- This hose is now mated to the pump. However if you use a different hose on the pump you may need to loosen clamps on the new hose and align it to the pump coupling by following the steps above.
Connecting 2 Hoses:
- As with the initial hose installation above, slide two stainless steel hose clamps over approximately 1-2 feet ( half a meter ) of the hose.
- Slide the hose end over the coupler, then slide the hose clamps over the hose and coupler, then position and tighten the two stainless steel hose clamps on each assembly.
- Join the two couplers together ( one will be male and one will be female ) using a clockwise motion and ensure they are as tight as you can get them. Slide the hose ends over the couplers. Then slide the hose clamps over the hoses and couplers into the same locations as described above BUT do not tighten yet.
- Ensure that the crease of both hoses line up exactly with each other so they do not twist upon filling with water and therefore could uncouple from each other. Now tighten the clamps securely and they are ready for use.
- These 2 hoses are mated to each other for future use. However if you use a different hose to join one of these you may need to loosen clamps on one hose and align the hoses so the ceares once again match on the 2 hoses you are using.
Note: Ensure there are no twists or kinks in the hose sections.
Anchoring & Positioning the Hose:
To prevent the empty hose from being twisted and blown on windy days secure the hose by placing the Warthog tie-downs over the hose and inserting the ends of the tie-downs on to the Warthog hold-down pegs, see picture.
The tie-downs should be used every 10 to 15 feet (3 to 5 meters).
In the event that there is a side wind or waves the WARTHOG PUMP may be secured by fastening a rope to the handle closest to the hose connection and fasten the other end to a stake or secure object at as wide an angle to the hose as possible.
Disconnecting the Hose from the Warthog Pump:
CAUTION: Before attempting to disconnect the hose from the pump, ensure the engine is turned off.
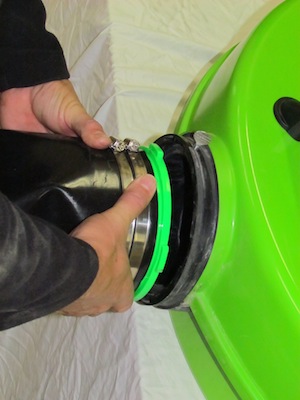
- Loosen the locking thumb screw so that the coupler can be turned, see picture.
- Twist the coupler in a counter clockwise direction and remove the hose and coupler together, see picture.
Pump Maintenance:
Engine – Refer to engine operator’s manual for engine maintenance.
Gear Case:
- Check the gear case oil level every 24 hours and/or before every use.
- Change oil in the gear case every 500 hours and also at the end of each season if storing the pump.
Storage of the Warthoghog Pump:
When storing the Warthog Pump drain the fuel tank, oil the carburator linkage and lube the cylinder head.
Trouble Shooting:
| Problem | Cause | Solution |
|---|---|---|
| Pump not level in water | Twisted hose | Disconnect the hose from pump or loosen the hose clamps, straighten the hose and reconnect. |
| Leaky Hose | Holes or tears in hose | Repair with patching tape |
| Hose bursting at pump | Too high of lift | Purchase the Warhog 50 foot high pressure hose specially designed to eliminate this problem. |
| Milky colored gear oil | Water seeping into gear case | Replace seal. |
| Engine is difficult to start | Fouled spark plug Old or poor fuel | Supply with new fuel, see engine owner’s manual. |
| Hose flips over when rolling out | Wind or breeze | Purchase the HHD-100 hose hold down kit. |
| Hose rolls down a sidehill | Hose not secured | Purchase the HHD-100 hose hold down kit. |
| Hose not withstanding rough commercial use | Using the standard hose | Purchase the Industrial or high pressure hose designed for rough use. |
| Coupling come apart | Hose not aligned on coupling | See the sections above on connecting hoses |
